Sequence 3 > Control Panel
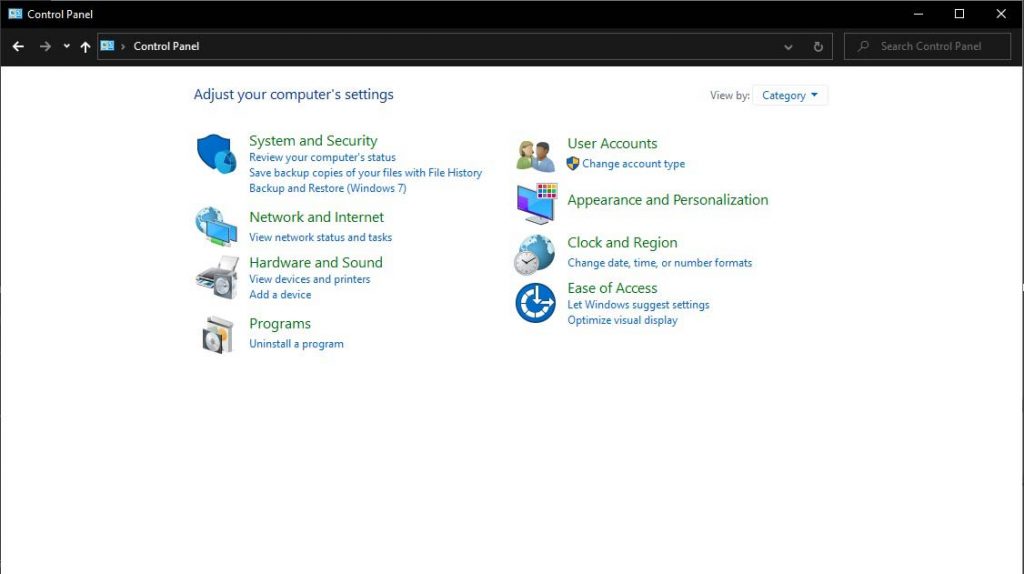
Click on the Windows Start Menu icon and type Control Panel. It comes up in the results. Press Enter or click on it to launch. This is the legacy version of the Windows Control panel, which exists side by side with the revamped version in Windows 10.
When it launches, click on System & Security, System, and then Advanced system settings. When the panel pops up, click on the Advanced tab. Under Performance, click on Settings.
Under Visual Effects, change settings as below:
- Animate controls and elements inside windows – on
- Animate windows when minimizing and maximizing – on
- Animations in the taskbar – off
- Enable Peek – off
- Fade or slide menus into view – off
- Fade or slide tooltips into view – off
- Fade out menu items after clicking – off
- Save taskbar thumbnail previews – off
- Show shadows under mouse pointer – off
- Show shadows under windows – on
- Show thumbnails instead of icons – on
- Show translucent selection rectangle – on
- Show window contents while dragging – on
- Slide open combo boxes – off
- Smooth edges of screen fonts – on
- Smooth-scroll list boxes – off
- Use drop shadows for icon labels on the desktop – off
Next click on the Advanced tab, under Virtual Memory set each drive to No paging file, then set the fastest drive on your system (preferably an SSD or NVMe drive) to System managed size and click on Set. Accept the changes. Next, select the Data Execution Prevention tab and select the first option which reads Turn on DEP for essential Windows programs and services only. Click OK.
Still on the Advanced tab, click on Settings under Startup and Recovery. Untick Time to display list of operating systems and make sure the default operating system is Windows 10.
Click Ok to exit.
Next, click on the Remote tab and disable Remote Assistance by clicking on the Advanced button. Untick Allow this computer to be controlled remotely. Click OK. Also, untick Allow Remote Assistance connections to this computer. Click Apply and OK to close the panel. If the Restart prompt pops up, simply select Restart later.
Navigate back to the Control panel home screen.
Next, click on Ease of Access. Once in there, you’ll hear the narrator’s voice reading stuff out. Simply untick the 2 boxes Always read this section aloud and Always scan this section.
Next, scroll down and click on Make the computer easier to see. Untick everything here except Turn off all unnecessary animations (when possible) and Remove background images (where available). Click Apply and OK.
Next click on Make the keyboard easier to use. Click on Setup Mouse keys. Untick Turn on Mouse keys with left ALT + left SHIFT + NUM LOCK. Scroll down to Other Settings and untick Display the Mouse Keys icon on the taskbar and select Off for Use Mouse Keys when NUM LOCK is:
Click Apply and OK to exit this screen.
Next click on Set up Sticky Keys and turn every setting off. Click Apply and OK. Next, click on Set up Filter Keys and also turn everything off. Click Apply and OK to exit the screen.
Next, click on Use text or visual alternatives for sound and turn everything off. Also set Choose visual warning to Off. Click on Apply and OK.
Finally, click on Make touch and tablets easier to use and select None from the dropdown. Click on Apply and OK to exit.
Navigate back to the Control panel home page. In the search box type Mouse and click on Mouse on the result list. The Mouse settings panel comes up.
Click on the Pointer Options tab. Under Motion untick Enhance pointer precision. Press Apply and OK. Close the Control panel window.
RELATED ARTICLE

Best Wi-Fi Routers for Gaming and Streaming
We round up the best of the best routers for gaming and streaming. Full Review and buying guide
On the desktop, click on the Start Menu button and enter the search term “File Explorer“. When it comes up, click on it from the results. The Windows Explorer opens. Click on View on the menu. Enable File name extensions by ticking the box. Next click on Folder Options and untick Show frequently used folders in Quick Access under Privacy. Next click on the Clear button beside the Clear File Explorer history.
Next, change the Open File Explorer to and select This PC. Finally, click Apply and OK.
Next, right-click on the Audio speaker icon on the taskbar. The Sound panel should come up. Right-click on any sound device you are not using and disable it. Next, right-click on your major sound device and select Properties. Under the Advanced tab, untick both settings there. Also, set your output quality to its highest setting.
Next, click on the Spatial Sound tab and set it to Off. Repeat the same procedures for the Recording tab. Next, click on the Communications tab. Select Do nothing from the set of options. Finally, click on Apply and OK to exit.
Next, type %appdata% in the search box and press enter. The folder opens. Open the folder Local and Temp. Delete all the files here by pressing SHIFT + Delete. Press Yes to delete all permanently.